|
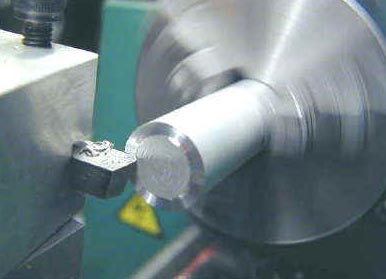
Facing is the process of removing metal from the end of a workpiece to produce a flat surface. Most often, the workpiece
is cylindrical, but using a 4-jaw chuck you can face rectangular or odd-shaped work to form cubes and other
non-cylindrical shapes.
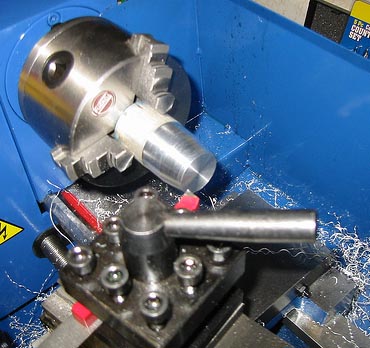
When a lathe cutting tool removes metal it applies considerable tangential force to the workpiece. To safely perform
a facing operation the end of the workpiece must be as close as possible to the jaws of the chuck. The workpiece should
not extend more than 2-3 times its diameter from the chuck jaws unless a steady rest is used to support the free end.
First, make sure the tumbler gear lever is in the neutral position so that the leadscrew does not rotate. This is very
important since you will clamp the half nut on the leadscrew during the facing operation to keep the saddle from being
forced back away from the end of the workpiece by the force of the cutting operation.
Clamp the workpiece tightly in the 3-jaw chuck. To get the work properly centered, close the jaws until they just touch
the surface of the work, then twist the workpiece in the jaws to seat it; then tighten the jaws. It's good practice
to tighten the jaws from all 3 chuck key positions to ensure even gripping by the jaws.
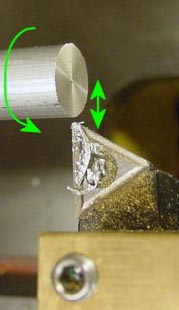
Choose a cutting tool with a slightly rounded tip. A tool with a sharp pointed tip will cut little grooves across
the face of the work and prevent you from getting a nice smooth surface. Clamp the cutting tool in the tool post and
turn the toolpost so that the tip of the cutting tool will meet the end of the workpiece at a slight angle. It is
important that the tip of the cutting tool be right at the centerline of the lathe; if it is too high or tool low you
will be left with a little bump at the center of the face.
Clamp the toolpost in place and advance the carriage until the tool is about even with the end of the workpiece. Make sure
that the compound is not all the way at the end of its travel towards the chuck.
Set the lathe to its lowest speed and turn it on. Make sure the leadscrew is not turning. Turn the lathe off and press
the half-nut lever down to engage the half-nut with the leadscrew. You may have to work the carriage back and forth a
little to get good engagement. Locking the half-nut to the leadscrew will prevent the carriage from moving back away
from the workpiece during the facing operation. If this were to happen, the end of workpiece would be a slight cone
shape instead of perfectly flat - or the tool might stop cutting entirely. A much better way to lock the carriage in
place is to add a carriage lock to your lathe as described on Varmint Al's site and on my mini lathe mods page.
Since we started with the tool just touching the end of the workpiece, you probably removed very little metal on
this pass. This is a good idea until you get used to how aggressively you can remove metal without stalling the lathe.
Also, since the end of the workpiece can be very uneven, you want to avoid gouging the tool into the end of the
workpiece if it hits a high spot.
Use the compound crank to advance the tool towards the chuck about .010" (ten one-thousandths of an inch, or one
one-hundredth of an inch). If the compound is set at a 90 degrees to the cross slide (which is how I usually set
mine) then each division you turn the crank will advance the tool .001 (one one-thousandth of an inch) toward the chuck.
If the compound is set at some other angle, say 30 degrees, to the cross slide, then it will advance the tool less
than .001 for each division. The exact amount is determined by the trigonometric sine of the angle. Since the sine of
30 degrees is .5 the tool would advance .0005 (five ten-thousandths or 1/2 of one one-thousandth of an inch) for each
division in this example.
If you crank the tool back towards you after it reaches the center of the workpiece you will notice that it removes a
small amount of metal on the return pass. This is because the surface is not perfectly smooth and it is removing metal
from the high spots. If you need to remove a lot of metal, to reduce the workpiece to a specific length, for example,
you can take advantage of this return cut to remove more metal on each pass by advancing the tool a small ways into
the workpiece on the return pass. Since the tool must plunge into the face of the workpiece, this works best with a
fairly sharp pointed tool.
Depending on how rough the end of the workpiece was to begin with and how large the diameter is, you may need to make
3 or more passes to get a nice smooth finish across the face. These initial passes are called roughing passes and
remove a relatively large amount of metal.
When you get the face pretty smooth you can make a final finishing cut to remove just .001 to .003" of metal and get
a nice smooth surface. The finishing cut can also be made at higher RPM (say 1500 RPM) to get a smoother finish.
|